Tag Archives: crafts

How to Make Pom-Pom Ornaments
How to make pom-pom ornaments: a snowman and a gnome pom-pom ornament.

Pom-poms are one of our favorite things to make (especially when made with a pom-pom maker… one of our favorite tools!), but what happens when you use pom-poms to make ornaments? CUTENESS overload!

I taught our company staff how to make these ornaments last year as part of our holiday festivities, and everyone had so much fun making their own custom ornaments that I KNEW I had to pass it along to you.

The supplies for making these ornaments are inexpensive (and you probably already have things around the house that will work well), especially if you use stash yarn. HOWEVER, I really love using Tuff Puff for making pom-poms because you can make them super quickly, and they turn out so full and fuzzy.

Read on to learn how to make a Pom-Pom Snowman / Snowperson ornament and a Pom-Pom Gnome ornament.

Pom-Pom Ornaments Supplies:

  • White Tuff Puff (or white yarn of your choice)
  • White sock yarn, cord or thread (We used Bare Hawthorne)
  • Felt, various colors, including orange
  • Pom-pom makers
  • Scissors
  • Toothpicks (or “mini craft dowels”)
  • Wooden buttons
  • Black beads
  • Mug for circle template
  • Hot glue gun and glue sticks
  • (Optional) Red & white striped pipe cleaners + wire cutters

To make Pom-Pom Snowman Ornament:

Two snowman pom-pom ornaments.

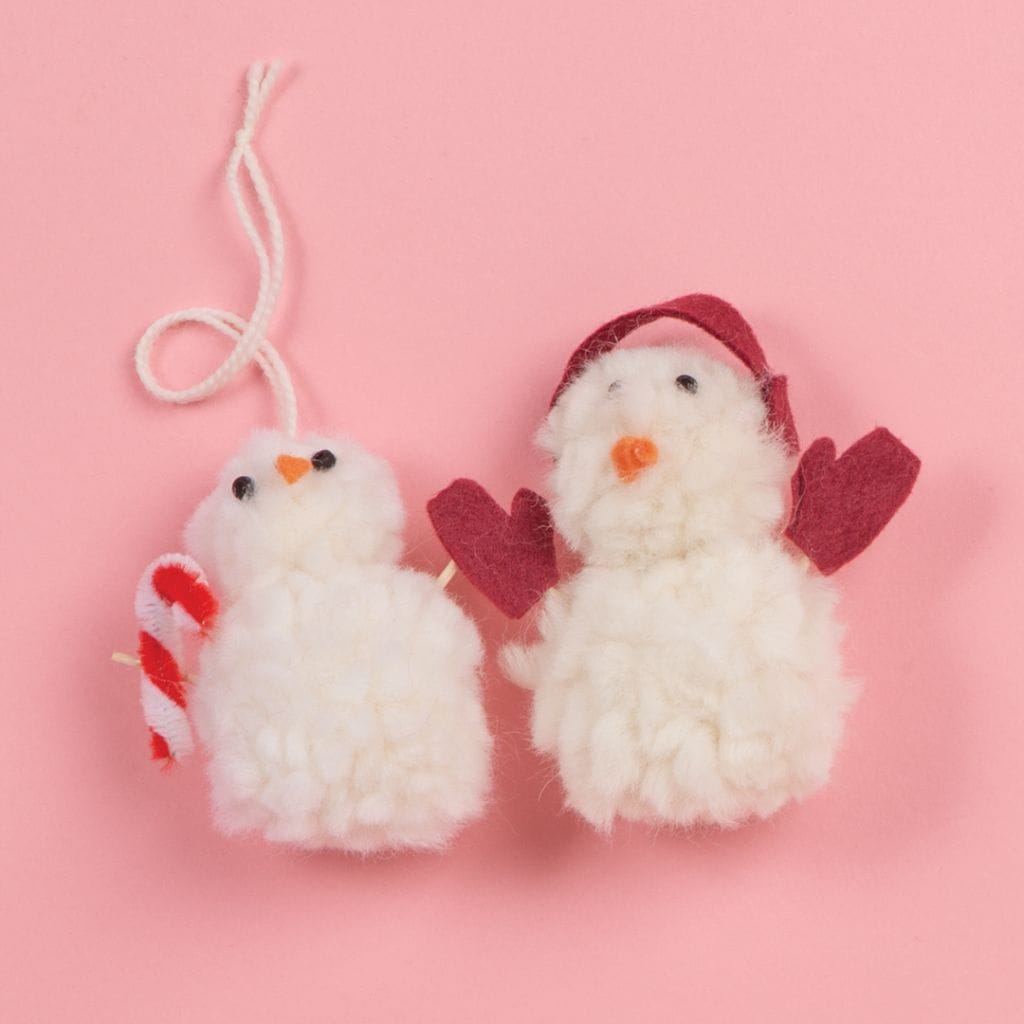
Snowman (or “Snowperson” as we call them in the office) Ornaments are so cute you’ll want to make several of them. Once you’ve made one, show your family how to make them too so everyone can get in on the fun. Each snowpersonality will emerge as you add accessories, so get creative!

  1. Snowman Body: First, make 2 pom-poms from white Tuff Puff using 2 different sizes of pom-pom maker (I used the small & medium pom-pom makers).  Quick Note: We have a video on our Youtube that demonstrates how to use a pom-pom maker.
    • Wrap pom-pom maker, close, then cut according to directions.
    • Tie around pom-pom securely with Hawthorne (or other strong cord), cut to about 12”.
    • Open up the pom-pom maker to release the pom.
    • Give pom-pom a “haircut” to even out the yarn. Leave Hawthorne tie long for hanging ornament.
    • Glue both poms together, leaving the tie at the top of the small pom.
  2. Earmuffs: Next, cut 2 small circles and a 1.5” rectangle for the headband from felt.
    • Glue circles to ends of rectangle to make the headband.
    • Hot glue earmuffs to pom-pom head to secure.
  3. Arms: Snap toothpick in half. Cut mitten shapes from felt and glue to the ends of half toothpicks. Hot glue toothpicks into pom-pom body.
    • Use a 1″ piece of pipe cleaner (cut with wire cutters) as a candy cane, if desired.
  4. Face: Use a small snippet of orange felt to make a carrot nose. Glue onto face.
    • Use a toothpick to pick up black bead and dip in hot glue, then glue it to the face as eyes.

Related Article: How to Use a Tassel Maker

To make Pom-Pom Gnome Ornament:

Two gnome pom-pom ornaments.

Nothing is cuter than these Nordic-inspired pom-pom gnome ornaments, and they’re so easy to make. Keep them minimal (in keeping with Nordic style), or go crazy and add any embellishments you want. One person in our office used a jumbo pom-pom maker to make a very large gnome ornament!

  • Head: Make a pom-pom from white Tuff Puff using larger pom-pom maker
    • Wrap pom-pom maker, close, then cut.
    • Tie around pom-pom securely with Hawthorne, then cut to about 12”.
    • Open up the pom-pom maker to release the pom.
    • Give pom-pom a “haircut.” Leave Hawthorne tie long for hanging ornament.
  • Hat: Make a hat with felt using a mug as a circle template. Slit circle from side into middle and then form into a cone, securing with hot glue. 
    • Slip Hawthorne tie through hole in top of hat for hanging ornament (note: a small crochet hook can help you slip the cord through the hole easily). 
    • Hot glue hat to pom-pom head to secure.
  • Nose: Hot glue wooden button just peeking out under hat.

You might also enjoy: 7 Plaid Crochet Patterns to Make

If you make some pom-pom ornaments, don’t forget to tag us on social media so we can see them! @wecrochetofficial on Instagram.

How to make Pom-Pom Ornaments: Two gnome pom-pom ornaments.


Tutorial: How to Make a Crochet Flower Bouquet
A bouquet of crocheted flowers in a jar

We love crochet flowers! They are quick and easy projects made for trying out new yarns in all your favorite colors. If you’re looking for 10 Ways to Use Crochet Flowers, be sure to pick up the latest issue of WeCrochet Magazine, Issue 2. The issue includes 10 ideas for using up crochet flowers and all the patterns we reference below.

Here is one of our favorite ideas: Make a Crochet Flower Bouquet!

Gather Materials Needed:

To make this flower bouquet you will need:

Optional:

Make the Pieces for Crochet Flower Bouquet

A model wears the Flower Garden Scarf crochet pattern
Flower Garden Scarf

Choose your favorite colors for Curio Crochet Thread #3. Use your crochet hook to make the Small and Medium flowers from the Flower Garden Scarf Crochet Pattern. Mix and match the colors as you like.

If the flowers are looking a bit wavy, you can block them! Soak the flowers in cold water for 20 minutes. Lay them flat to dry or use T-Pins to spread them on blocking boards. Check out our blocking kit if you need more blocking tools.

Attach the flowers to the floral wire by inserting the wire through a few stitches at the back of the flower. Further secure the flower by bending the wire and/or using the yarn ends to tie and attach. Trim or bend the wires so the flowers are varying heights.

Arrange and Assemble the Crochet Flower Bouquet

Gather a collection of additional flowers or greenery. It’s fun to pick additional flowers that are a similar color palette to your crochet flowers. Arrange the flowers in a vase or mason jar. Bend the floral wires as needed to help flowers stay in place.

For an added crochet touch, arrange the flowers in a mason jar and then crochet the Lovestruck Jar Cozy as a mason jar cover. This pattern is made in Curio #10, so it’s easy to perfectly match the jar’s color palette with your crocheted flowers.

Get WeCrochet Magazine, Issue 2!

The cover of WeCrochet Magazine issue 2

Find all the patterns and instruction you need to make this flower bouquet with WeCrochet Magazine, Issue 2. Inside you’ll find 10 Things to do with Crochet Flowers, the Flower Garden Scarf Pattern, the Lovestruck Jar Cozy, plus more crochet patterns for Spring!

Find Curio crochet thread, size #10 and #3, in a thrilling color palette on crochet.com. (Find blocking tools, crochet hooks, and project bags there, too!)

Share your crochet flower bouquet with the crochet community! Post pictures with #WeCrochet on Facebook, Instagram, Pinterest, and Ravelry!


Tutorial: Make a Crochet Flower Crown
Crocheted flowers attached to an elastic headband make a great crochet flower crown

A crochet flower crown is the perfect spring accessory and so much fun to make! There are so many opportunities to customize this project exactly as you like it. Try it with a handful of colorful flowers and crochet leaves, as pictured OR pack the entire headband full of many flowers. Try it in multi-color yarns or make all of the crochet components in a single color. The look and style is up to you!

Related Post: Crocheted Flower Bouquet Tutorial

Materials for Crochet Flower Crown

Gather all the materials you’ll need to create this fun crochet flower crown! To make this project as pictured you will need:

A model wears the Flower Garden Crochet Scarf, a scarf made from many colorful crocheted flowers sewn together
We used flowers from the Flower Garden Scarf pattern to make a flower crown

Make Crochet Flower Crown

There are many ways to create a flower crown! Here are the specific instructions for the flower crown we created for WeCrochet Magazine, Issue 2! If you’re looking for other ways to use crochet flowers, be sure to grab a copy of the latest issue!

  • Begin by crocheting 5 flowers from your chosen flower pattern in a range of coordinating colors.
  • Crochet 2 leaves to place at the edges of the flowers.
  • Block flowers and leaves so they lay flat. Find all the tools you need for blocking in our Basic Blocking Kit
  • Use needle and thread to sew your elastic band into a headband.
  • Use needle and thread to attach crochet flowers and leaves to your elastic band.
The crocheted flower crown displayed on some decorative white porcelain antlers

Get WeCrochet Magazine, Issue 2!

A picture of the cover of WeCrochet Magazine Issue Two, featuring colorful yarns and flowers

If you love crochet flowers, you’ll want to order a copy of WeCrochet Magazine, Issue 2! The issue is packed full of patterns and projects inspired by Spring blooms and other fun spring things. You’ll also find an article on 10 ways to use a crochet flower!

Share your crochet flower crown with the crochet community! Post pictures with #WeCrochet on Facebook, Instagram, Pinterest, and Ravelry!