Who wants to talk about Thrifty Crochet Tips? In this post, I’m going to reveal all my tips and tricks for saving money on crochet accessories. From stitch markers to stuffing, we’re covering it all!

Some things in life feel difficult to start because of the financial barrier of entry. How am I going to learn to sail or snowboard if I don’t own a boat or a snowboard or any of the supplies and tools? Thankfully yarn crafts like crochet have a low barrier of entry and I’m hoping to smash additional barriers here.
What do I need to get started with crochet?
To crochet you simply need a hook and some yarn.
Having time, curiosity, drive and desire also helps but those things are almost always free. If you’re like me, once you start a fiber craft you might notice that there’s a lot more stuff involved (like tools and accessories) that people use and talk about all the time that you didn’t really know about before starting. That can feel intimidating.
The following is a list of thrifty crochet tips that can help elevate your crochet projects without you having to buy a lot of accessories so you can have money to buy the hooks and yarn you really want.
1. Thrifty Crochet Project Bags
I never considered keeping my works-in-progress projects in a bag until this past year. For a long time, I just wrapped the project a few times in the yarn I was using and threw it into whatever purse, backpack or bike bag I was using at the time. When I was introduced to the idea of a project bag, it felt like someone turned on an extra light in the room. Oh right, yeah, that’s nice.

Thrifty Crochet Project Bag Ideas:
- Bedsheet Bags: Sometimes when you buy sheets for your bed, they come in a fabric bag that is perfectly sized and just begging you to put your project in. Thankfully I have been saving these random bags for awhile so I had a few on hand ready to go as I accumulated a ton of Works-In-Progress (WIPs).
- Clear Plastic Bags: I also like the clear plastic bags that sometimes have a snap or zipper that sheets or home goods come in. Also, don’t forget old reliable zip-top bags! (Quart or gallon size works well for a variety of WIPs).
- Old Gift Bags: If you’re the type to save old gift bags for reuse, they make dandy project bags.
Crochet Your Own Project Bag:
You can also crochet your own project bag. Crochet is a craft that is wonderful for making bags. This seems obvious but I think it’s worth mentioning. It’s actually a super fun reminder of your creative prowess. It’s also an opportunity to practice new stitches, techniques or even yarn. Also, it’s a great way to put your thrifty crochet into practice!
Sew a Project Bag:
You could also sew a quick project bag yourself. There are actually a lot of great tutorials and Youtube videos on how to make a bag out of an old t-shirt without sewing. Or if you’re someone who has a sewing machine and some extra fabric lying around, consider this option and just make your own project bag.
2. Thrifty Stitch Markers

Stitch markers are so handy for both beginning crocheters and experienced crocheters. I don’t love counting during crochet and when I realized that about myself I leaned into using stitch markers to help. While the ones available to buy are nice, I don’t often have them when I need them.
Thrifty Crochet Stitch Marker Ideas:
I have used
- paper clips
- safety pins
- Bobby pins and
- even scrap yarn as stitch markers.
- Concert and political buttons could work in a pinch.
3. A Thrifty Cutting Tool
It can feel frustrating when you need to change yarns or finish a project and you need to cut the yarn but you don’t have a cutting tool. I often try to break the yarn with my brute strength but sometimes the yarn is stronger than I am. While a pair of scissors won’t break the bank, if you’re like me, sometimes you just don’t have a pair of scissors in your hour of need.
(Image description for above photo: one of TLYarnCrafts’ instagram posts, a flatlay showing a bit of a crocheted project, along with a hook and some pretty scissors.)
Thrifty Crochet Tip: How to Cut Yarn Without Scissors?
I usually keep a pair of nail clippers in with my hooks so that when I need to cut some yarn, they’re there. Usually you can get several nail clippers in bulk and then you can put one in each project bag so that they are there when you need them.
4. Making pom-poms and tassels, the thrifty way

Adding pom-poms and tassels to a project can really make it seem extra special. It’s also a fun activity to do with kids and can help to stash-bust, or use up leftover yarn. I add removable pom-poms to a lot of hats but I don’t make a lot of tassels. As my project queue grows and I start adding more shawls and blankets, I’m sure I’ll start needing more tassels.

I didn’t know what pom-pom makers and tassel makers were until I was much older in life. When I was a kid I simply made pom-poms from cut cardboard. Having some card board around can really help with a lot of crafting projects (and gardening projects.) For making pom-poms from cardboard I simply cut two doughnut shapes, a circle with a hole in the middle. I would cut a slit to create that inner hole like in the picture above.
You can make tassels by wrapping yarn around a cardboard rectangle. Remove the yarn and tie a knot around the middle of the bundle to create the tie. Then tie off the head of the tassel. You can find lots of good tutorials for making tassels with a quick internet search.
5. Thrifty Project stuffing
When I started crocheting stuffies (or Amigurumi) I learned that most people fill theirs with polyester fiberfill, aka stuffing. I didn’t have any fancy fiberfill on hand but I realized what I did have was a large amount of scrap yarn and some old cotton balls.
Use Scrap Yarn to Stuff Crochet Projects

I’m someone who is very aware of the waste I create in the world and where it goes, so I have always kept that scrap yarn in some small containers at the bottom of my craft closet. I didn’t know what I was going to do with it, but I knew it would be useful to me someday. One of those days came when I needed stuffing for a narwhal I made for my kiddo, so I used up my scrap yarn pile.
When I say scrap yarn, I’m talking about the 3- to 24-inch pieces of yarn cut off from projects that I’ve saved. Different fibers, different weights, densities, plys. Basically the yarn that was too short for a stash-busting project.

Depending on its use, you can stuff crochet projects with other things too. For instance, excess plastic shopping bags make a great stuffing for some things (like a stadium seat, or some ottomans). Heather has used the stuffing from old pillows for some of her amigurumis.
Bonus tip: A lot of amigurumis and stuffies looks best sitting up and beads are one way to do that. I like the cheap plastic pony beads best. Put the beads in a closed plastic baggie and stuff it into the correct area of the stuffie to make it sit upright. Fill the rest with other stuffing.
Historically people have used beans or rice for this, but using organic items limits the option for washing your stuffies, as dried food items will be ruined if they get wet (and will ruin your finished object).
6. Securing projects
I definitely abuse my WIPS, throwing them in this bag or that. I am somewhat of a compulsive tidier that doesn’t want a lot of clutter and my yarn projects often are victims to this. I do not recommend this. Things come unraveled and I often lose my place if following a pattern.
I find it can be helpful to use hair clips or small binder clips to help secure my yarn, hook and project together. I’ve even used hair ties to keep everything together in my project bag.
7. Blocking mats
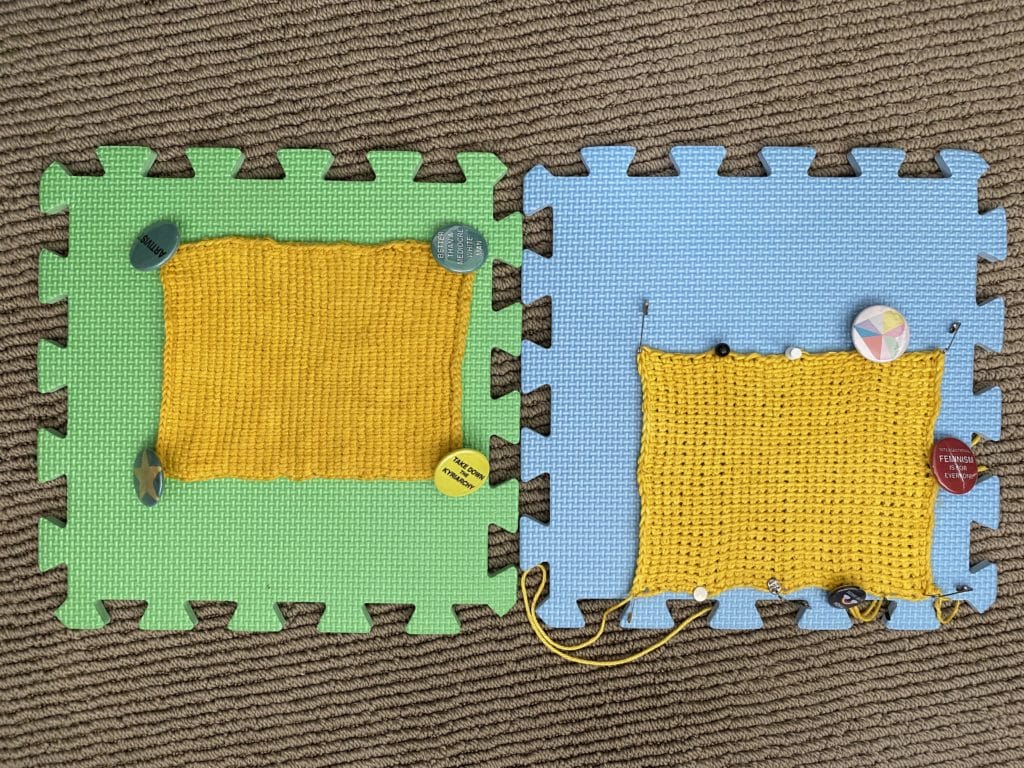
I’m a newer convert to the school of blocking. I now look forward to that final step and sculpting and finishing a project through blocking.
You might also enjoy: How to Block Your Crochet Projects
That said, I didn’t use to be a blocker and one of the reasons is because I didn’t have all the tools to do so. I didn’t have blocking mats and I didn’t have T-Pins. BUT I did have my kid’s play mats and I did have button badges.
Cardboard boxes also work as blocking mats. Cardboard is especially nice for larger projects like shawls. Break down a cardboard box and lay it flat to create a great surface for blocking your crocheted items. You can use standard sewing pins to pin the blocked item to the cardboard.
Which brings us to…
8. Buttons and pins

T-pins are very nice and useful tools that keep your blocked items safely attached to your blocking board, but so is the collection of concert and political buttons I used to use to adorn my favorite denim jacket. I ended up using these badges to pin my items to my kiddo’s play mat, and it worked (see photo in section 7 to observe these buttons in action!) This was a hack I discovered out of the utility of needing to block a protect and not having all the right tools. It worked.
And, as mentioned in item #7 before, standard sewing pins will work in a pinch if you need to block something. The reason T-Pins have become the standard is because of their strength, and the T-shape on the top keeps items with larger holes (like crochet) stuck, but you can still use other kinds of pins too.
9. Plarn!

Plarn is plastic yarn made out of recycled plastic bags (or other plastic items, like party tablecloths).
I mentioned earlier that I spend a lot of time thinking about waste and where it goes. This obsession occupies a lot of my daily life including collecting plastic bags so I can make plarn. Plarn is cutting up plastic bags and winding it up to create a ball-of-yarn-type material.
According to Vickie Howell, one plastic shopping bag can be recycled into approximately 9 yards of plarn. <–Follow that link to find out how to make plarn from shopping bags!
Plarn is best used for items that need to be heavy duty, and don’t need to be soft and cozy. Try plarn for making outdoor sleeping mats, outdoor rugs, or reusable shopping bags.
10. Upgraded Yarn: Add Fancy Yarn to Basic Yarn

I currently love holding a “pricier” yarn with a “cheaper” yarn to help make it seem more special. I made a series of Brava Beanies holding Aloft which is lace weight mohair with Brava worsted acrylic yarn. I’m currently using Aloft to assist in many of my gifts to add a special halo effect.
This tip has been around probably long before I was on this earth. Crafters are pretty crafty. I’m including this tip because it has really elevated some of my gift knits and crochet projects.
Hopefully this roundup of Thrifty Crochet Tips has helped open your eyes to the fact that you don’t have to spend a ton of money to have all the tools you need for crocheting.
If you want more, Heather and I talked about Thrifty Crochet Tips in a podcast episode we did earlier this year called Hooks Down, Level Up .
Do you have any great thrifty tips?